Spring Cloud作为时下微服务开发最为流行的框架,除了提供服务发现、网关、负载均衡与熔断等组件外,另外也提供了如配置中心,分布式追踪等辅助组件。今天就来介绍下Spring Cloud下的配置中心组件。
Spring Cloud下配置中心有两种实现方式,一种是spring-cloud-config,另一种则是spring-cloud-zookeeper-config。
Cloud Config VS Cloud Zookeeper
Spring Cloud Config,版本控制
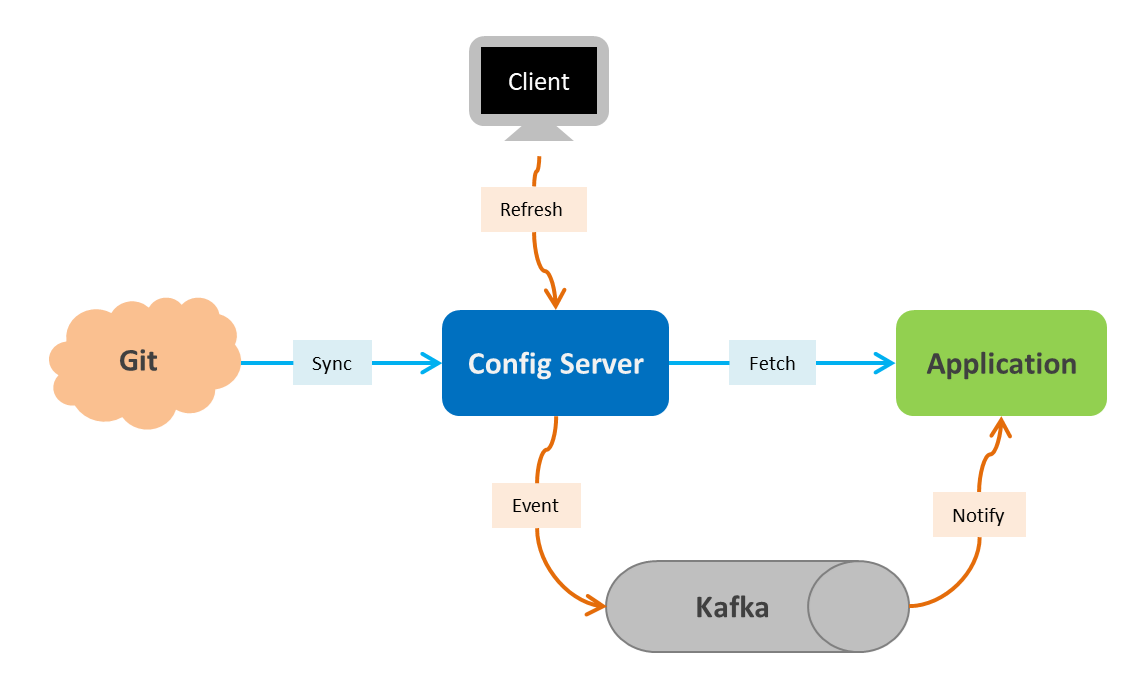
由Server、Client、Git (SVN|File System|DB) 三个部分来实现配置中心。Server负责将Git中存储配置文件发布成REST接口,为防止Git仓库故障无法获取配置文件,Server会在Git本地缓存暂存配置;Client调用Server的REST接口获取配置;Git则是用来存储配置文件,并且通过Git可以实现配置文件多版本控制。
由于客户端不能主动感知配置文件的变化,只能调用客户端的/refresh接口刷新配置,因此要想实现自动刷新的功能需要其他组件配合实现。一种是通过Git的WebHook功能进关联,但此方式需要维护客户端服务列表;另一种是通过Spring Cloud Bus下发变更通知。因此sping-cloud-config在配置自动刷新方面实现起来还是相对较为复杂的。
Spring Cloud Zookeeper,自动刷新
此项目使用Zookeeper作为配置中心协调者,Zookeeper作为配置中心的服务端,客户端通过spring-cloud-zookeeper-config实现配置自动加载与刷新,能够与SpringBoot无缝结合。Zookeeper提供了分层的命名空间,允许客户端自由存储配置信息。但是Zookeeper没有版本控制的功能,需要自行实现。
Spring Cloud Config
系统架构
配置拉取
Server端代码
build.gradle
1 2 3 4 5 6 7 8 9 10 11 12 13 14 15 16 17 18 19 20 21 22 23 24 25 26 27 28 29 30 31
| buildscript { ext { springBootVersion = '2.0.1.RELEASE' } repositories { mavenCentral() } dependencies { classpath("org.springframework.boot:spring-boot-gradle-plugin:${springBootVersion}") } } apply plugin: 'java' apply plugin: 'org.springframework.boot' apply plugin: 'io.spring.dependency-management' repositories { mavenCentral() } dependencyManagement { imports { mavenBom 'org.springframework.cloud:spring-cloud-dependencies:Finchley.SR1' } } dependencies { compile 'org.springframework.cloud:spring-cloud-config-server' compile 'org.springframework.cloud:spring-cloud-starter-bus-kafka' compile 'org.springframework.boot:spring-boot-starter-actuator' }
|
特别注意:SpringBoot与SpringCloud的版本要比配,否则会出现自动刷新不可用的问题。这里用到的版本是SpringBoot: 2.0.1.RELEASE及SpringCloud: Finchley.SR1,其他版本未详细测试。
application.yml
1 2 3 4 5 6 7 8 9 10 11 12 13 14 15 16 17 18 19 20 21 22 23 24 25 26 27 28 29
| server: port: 8888 spring: application: name: config-server cloud: bus: trace: true config: server: git: uri: https://github.com.com/xxx/spring-config-repository.git search-paths: config/ username: xxx password: xxx stream: kafka: binder: zk-nodes: localhost:2181 brokers: localhost:9092 management: endpoints: web: exposure: include: bus-refresh
|
ConfigServerApplication.java
1 2 3 4 5 6 7 8 9 10 11 12 13
| import org.springframework.boot.SpringApplication; import org.springframework.boot.autoconfigure.SpringBootApplication; import org.springframework.cloud.config.server.EnableConfigServer; @SpringBootApplication @EnableConfigServer public class ConfigServerApplication { public static void main(String[] args) { SpringApplication.run(ConfigServerApplication.class, args); } }
|
Client端代码
build.gradle
1 2 3 4 5 6 7 8 9 10 11 12 13 14 15 16 17 18 19 20 21 22 23 24 25 26 27 28 29 30 31 32
| buildscript { ext { springBootVersion = '2.0.1.RELEASE' } repositories { mavenCentral() } dependencies { classpath("org.springframework.boot:spring-boot-gradle-plugin:${springBootVersion}") } } apply plugin: 'java' apply plugin: 'org.springframework.boot' apply plugin: 'io.spring.dependency-management' repositories { mavenCentral() } dependencyManagement { imports { mavenBom 'org.springframework.cloud:spring-cloud-dependencies:Finchley.SR1' } } dependencies { compile 'org.springframework.boot:spring-boot-starter-web' compile 'org.springframework.cloud:spring-cloud-starter-config' compile 'org.springframework.cloud:spring-cloud-starter-bus-kafka' compile 'org.springframework.boot:spring-boot-starter-actuator' }
|
bootstrap.yml
1 2 3 4 5 6 7 8 9 10 11 12
| spring: application: name: config-client cloud: config: uri: http://localhost:8888 profile: test stream: kafka: binder: zk-nodes: localhost:2181 brokers: localhost:9092
|
ConfigClientApplication.java
1 2 3 4 5 6 7 8 9 10 11 12 13 14 15 16 17 18 19 20
| import org.springframework.boot.SpringApplication; import org.springframework.boot.autoconfigure.SpringBootApplication; @SpringBootApplication @RefreshScope @RestController public class ConfigClientApplication { public static void main(String[] args) { SpringApplication.run(ConfigClientApplication.class, args); } @Value("${text}") private String text; @GetMapping("/text") public String text(){ return text; } }
|
Git仓库配置
config/config-client-test.yml
1 2 3 4 5
| server: port: 10001 text: Hello World
|
Client端运行结果
1 2 3 4 5 6
| 2018-10-26 14:12:43.587 INFO 1200 --- [ main] c.c.c.ConfigServicePropertySourceLocator : Fetching config from server at : http: 2018-10-26 14:12:58.076 INFO 1200 --- [ main] o.s.b.w.embedded.tomcat.TomcatWebServer : Tomcat initialized with port(s): 10001 (http) 2018-10-26 14:12:58.123 INFO 1200 --- [ main] o.apache.catalina.core.StandardService : Starting service [Tomcat] 2018-10-26 14:12:58.124 INFO 1200 --- [ main] org.apache.catalina.core.StandardEngine : Starting Servlet Engine: Apache Tomcat/8.5.34 2018-10-26 14:13:00.352 INFO 1200 --- [ main] o.s.b.w.embedded.tomcat.TomcatWebServer : Tomcat started on port(s): 10001 (http) with context path '' 2018-10-26 14:13:00.358 INFO 1200 --- [ main] s.c.c.d.client.ConfigClientApplication : Started ConfigClientApplication in 20.583 seconds (JVM running for 21.917)
|
配置刷新
启动ConfigServer及Client,调用Client的textAPI,输出结果为Hello World。
在Git上修改text值为Hello World 1234并提交;
用POST方式调用ConfigServer的/actuator/bus-refresh端点刷新配置;
- 再次调用Client的
/textAPI,输出结果为Hello World 1234;
刷新命令:curl -X POST http://configServer:8888/actuator/bus-refresh
可以通过Git的WebHook方式自动触发刷新动作。
代码地址
GitHub: https://github.com/CharleyWuCL/spring-config-sample